
Panoramic Photography System
After working with parallel photography recording system for years, Factum Arte decided to investigate the possibility of using a panoramic recording system. The goal was fast, very high quality and reliable color image recording of cultural heritage and works of art. Ultimately at the end of 2010, after research and weighing feasibility, the development started.
At the end of 2010 we started working with German company CLAUSS and purchased a panoramic system. CLAUSS has been working on panoramic photography equipment since 1993, when they developed the world's first electronic panoramic camera. The first pan-and-tilt head was developed and manufactured in 2003 and since then, it has been used world-wide for recording high quality panoramic images by photographers, artists, producers, and industries.
This panoramic equipment was selected for its build quality, reliability an the ability to work for many hours at a time. At Factum Arte, it has been used to record large paintings, relief structures and entire painted rooms in 360x180 degree mode.
Grégoire Dupond started defining Factum Arte's specific brief and equipment needs. He engaged in extensive conversations with Roland Clauß and Susanne Clauß. They responded and helped find a way to achieve the goal of overcoming the problems inherent in recording cultural heritage.
Automated panoramic photography equipment consists of a motorised panoramic head and a computer (to control the head) as well as the recording device (camera) and the archiving software to download and name the resulting photographs.
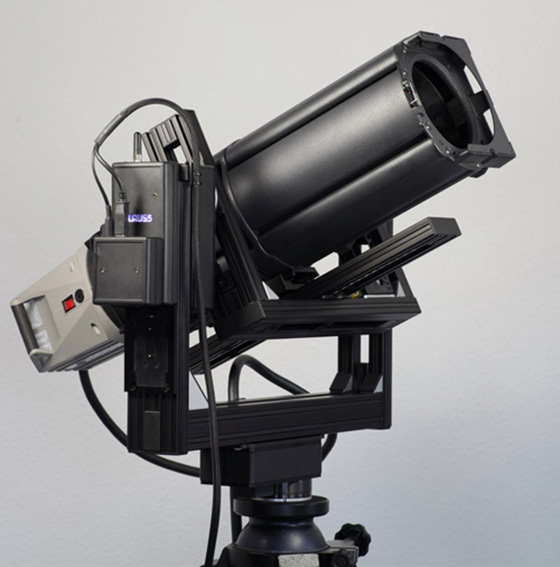
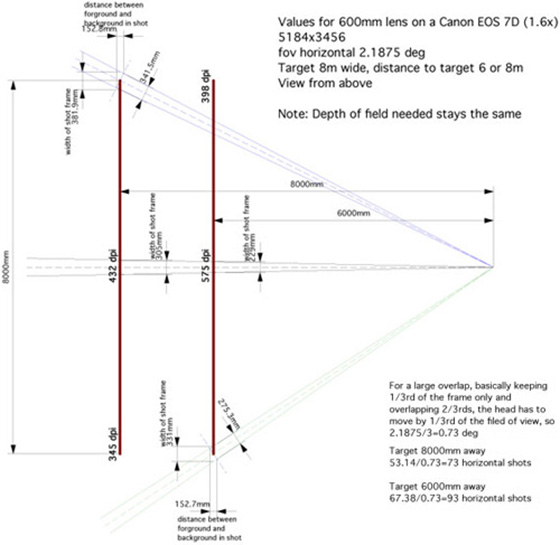
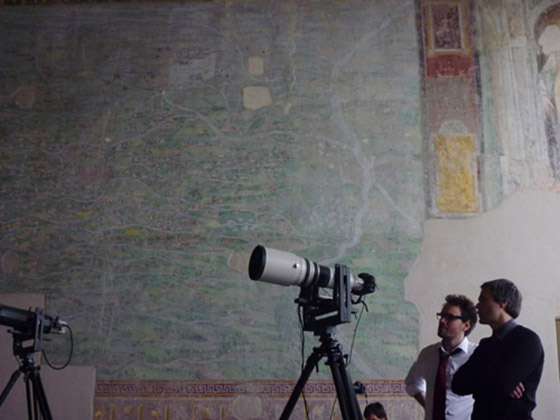
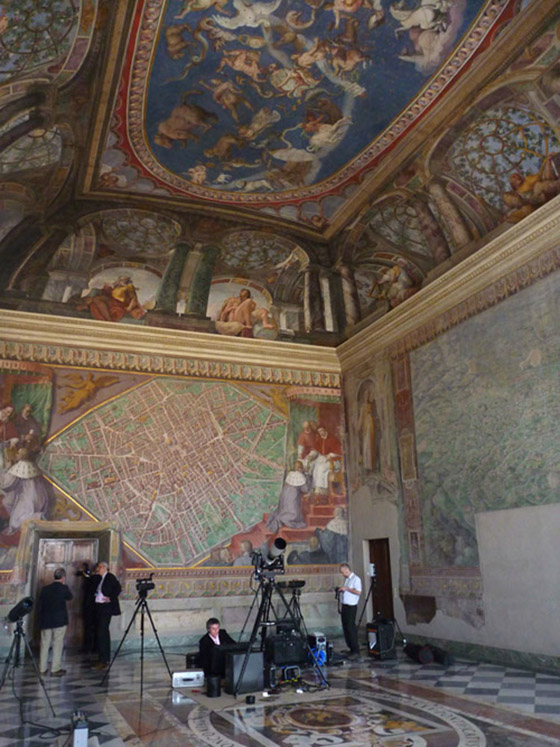
Our first requirement was simple - Factum Arte had to record the whole of the Sala Bologna in the Vatican in 3 working days. The aim was to photograph at a distance of 6-9 meters and still achieve high resolution (400-600dpi at 1:1). A 600mm telephoto lens was fitted to a DSLR. Due to the weight of the lens a sturdy full frame panoramic head was needed, accurate enough to move 6+ kg of equipment in steps of 2-degrees or less. CLAUSS already had this equipment.
When recording at high resolution with a 600mm lens, the lighting is a critical issue. Even with the most stable CLAUSS HD panoramic head, vibrations during the exposure time could not be avoided except by waiting many seconds after each movement and 'mirror up' (during this time the system would physically stabilize). Many seconds multiplied by thousands of photographs means hours of lost time. In addition to this, there were serious focus and depth of field issues. In order to profit also from the best settings for the lens, it was necessary to 'stop down' the lens at f9 to f16, reducing the light coming in, resulting in very long exposures. This also resulted in a workflow that was impractical.
The use of a UV filtered high speed flash was the solution to shoot fast, freeze each photograph and get the maximum sharpness possible. The flash system we chose was an Elinchrom 1/1000th of a second duration flash head, coupled with a zoom unit made of 2 large lenses that can focus the flash beam to suit the very small angle of view of the 600mm lens.
The main specification that Factum Arte pushed for was to separate the flash unit working in tandem with the photographic equipment. The usual setup, in fact the one that has been used until now by everybody using panoramic equipment with follow-on (not ambient) lighting, was to mount the flash unit with the panoramic head. However, this solution results in the flash beam and the camera operating in line with the lens axis. The advantage of this method is an absence of shadow (which can be a good thing but is not always desirable) but the drawback is that you produce an extremely destructive hotspot when the lens axis is perpendicular to the surface of the painting and the flash is directly reflected back into the lens. Usually this happens at the very center of the painting (depending on the height of the painting and the position of the panoramic head). This is a disaster when working under pressure and results in varying exposures (in the hotspot the image is over-exposed with very strong speckles of light). The post-processing required to repair this is laborious and can never recreate color or information that was lost in the recording.
By separating the recording equipment from the lighting equipment we were able to achieve remarkable results - but a second panoramic head was needed. Software was also required to build a link between the two panoramic heads - the lighting system worked as a slave to the recording system. The benefit was that the lighting equipment head could be placed wherever was needed to avoid reflections. It could be moved in the middle of a recording session by pausing the session and restarting it, without loosing our reference point (as the position of recording equipment never changed). If placed very close to the camera equipment shadows could be avoided, but equally, if placed at an oblique angle tot he surface the shadows could be exaggerated (raking light).
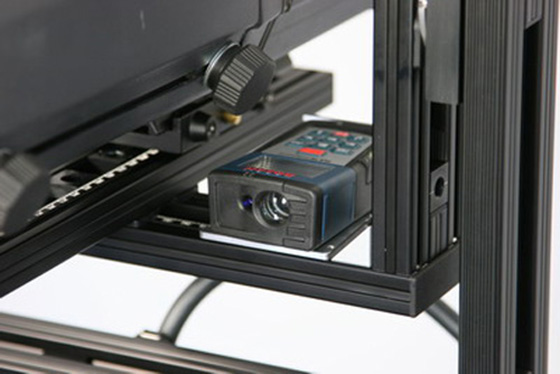
Calibration
For the system to work, it is essential the two heads are calibrated. The 2 heads are placed in position then calibrated using a laser measuring device. When perfectly calibrated the lighting equipment follows the recording equipment over a flat surface. If the surface is not perfectly flat re-calibration in the middle of a session is possible. Once the specifications were agreed the team at CLAUSS wrote the necessary software. Extensive tests were then carried out at Factum Arte to reveal any problems. These were then 'debug' until the system worked perfectly.
Focus
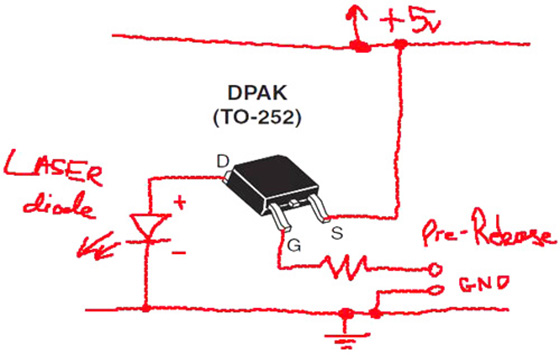
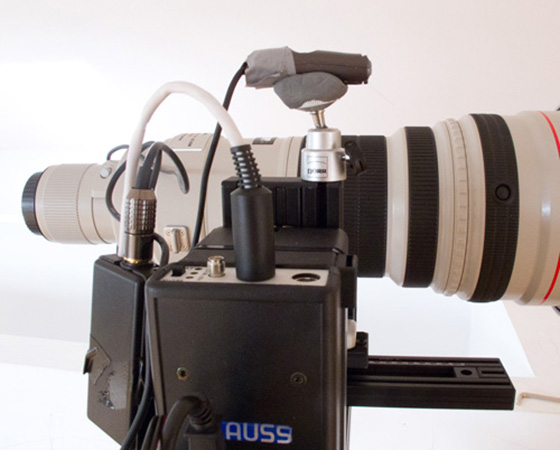
Focus presented another type of problem. The autofocus can work well when there are clearly defined features on the surface, but when recording an area of continuous colour the autofocus does not work as there are no 'features' to focus on. A low-powered patterned laser pointer was attached to the recording head in line with the lens axis. It was wired to trigger when the autofocus was activated providing a clear target that could be focused.

Special applications
Combining focus stacking and panoramic recording. An object with too much relief to be shot with enough depth of field was shot as 5 recording sessions with 100 photographs each, adjusting the focusing distance manually between each, in order to cover the whole depth of field necessary to have the object in focus everywhere on the final image.
The 5 planes of photographs were stitched together using PTGui Pro, multiplying control points (222580 control points, an average of 10 per pair of overlapping images) between photographs of the same plane and photographs on different planes, until a stitching result of sub-pixel accuracy was achieved.
Then the 5 planes were rendered separately as 16 bits 200 Mega Pixels images, and the 5 planes were merged together using focus-stacking software technology. The result is a 200 MegaPixel image with continuous focus sharpness.
Conclusion
The system was assembled to record the Sala Bologna in the Vatican. This was recorded in three working days at the beginning of April 2011.The whole room was recorded at high resolutions of between 150 and 600dpi (at 1:1).
The system has since been used in the Museo del Prado, Museo Centro de Arte Reina Sofia, Madrid as well as on other projects with contemporary artists and with Google Culture.
Q & A
What are the working differences between parallel recording and panoramic recording?
Parallel recording moves in a plane the recording equipment on a frame parallel to the surface of the painting, covering the whole surface. Recording is slow and can take days or weeks for large surfaces.
Panoramic recording moves the recording equipment around a single point, covering the whole surface by horizontal and vertical angular movements. Recording is fast (approximately one hour to record 10 square meters at 600dpi).
What are the visual differences in resulting image between parallel recording and panoramic recording?
Parallel recording makes each single photograph taken with its own point of view. True parallelism happens only at the center of each of these images, everything around that center is viewed at an angle. The closer (macro) the recording equipment is to the surface, the more it is accentuated, resulting in stitching difficulties in the case of relief (what is seen on the right of a photograph can be very different from what is seen on the left of the next photograph). It is a bit like seeing the north face and the south face of a mountain, they generally look very different. In the case of completely flat recorded surface, parallel recording can in theory achieve better resolution than panoramic recording.
Panoramic photography records an image from a single point of view. In theory the resulting image would show exactly what a viewer would see of the original target, when standing at the position of the recording equipment. Local distortion described above for parallel recording disappears due to the distance at which the surface is recorded (6-9m). Any relief in the surface potentially hides some of the image- this data cannot be recorded.
What are the post processing differences to produce resulting image between parallel recording and panoramic recording?
Parallel recording makes each single photograph taken with its own point of view, as seen above. So the reference used for stitching is the position of the recording equipment in the flat plane, and knowing that position exactly for each photograph. If recording at 600 dpi, a theorical precision of 40 microns (0.04 mm) is necessary on the recording of the camera position and the movement on the flat plane to achieve automated sub-pixel accuracy without extensive time-consuming manual tweaking.
Panoramic recording records all images from a single point of view. That single point of view becomes an absolute reference for all images and all images are assumed to be shot from that point. This results in the stitching software being able to recalculate exactly the position of each photograph in the space (with no need for an absolute accuracy in angular movement on the panoramic head itself), simply knowing its relation with its immediate neighbour is enough. The position of common features between neighbouring photographs - known as control points will result in pixel or sub-pixel accuracy. In theory the stitching software does not know the shape of the recording surface so all calculations are made assuming the recording surface is an exact sphere around the single point of view. Resulting image is then re-projected assuming a flat surface (parallel horizontals).
Copyright 2011 Factum Arte